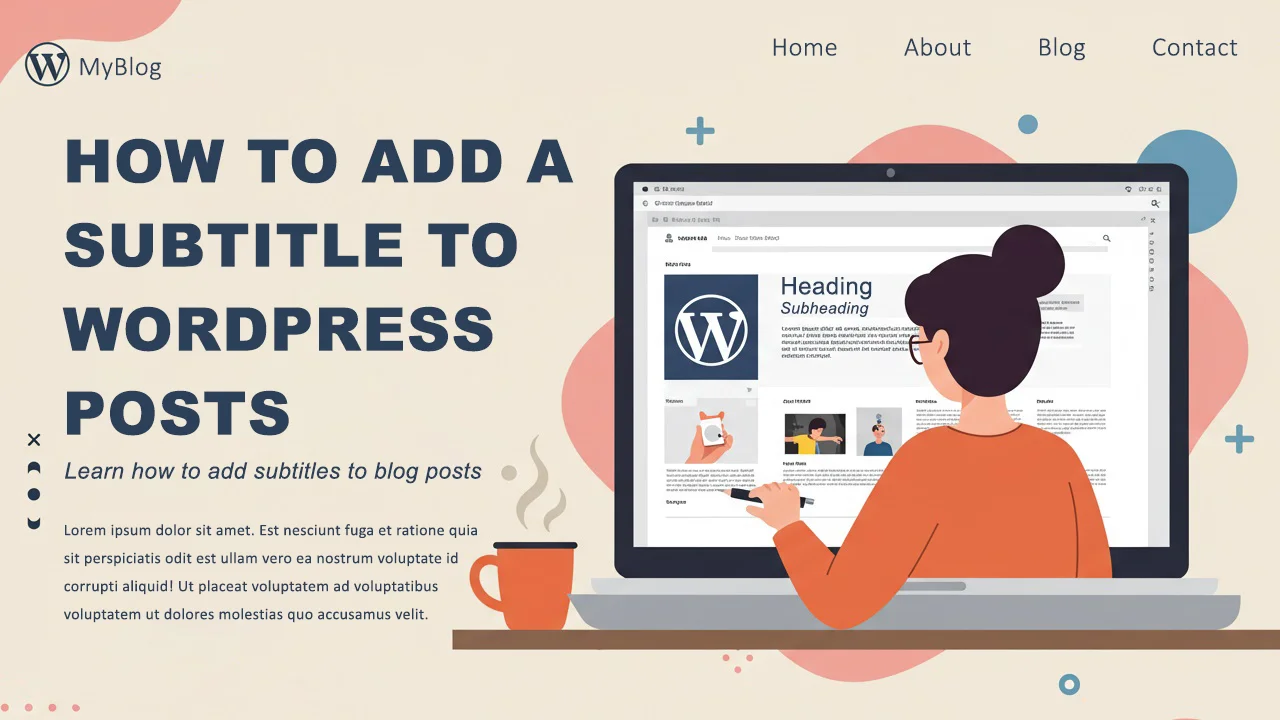
How to Add a Subtitle to WordPress Posts Without Plugin [3 Best Methods]
Have you ever noticed how many news websites use two titles—one main headline and a smaller subheading underneath? It adds depth and context to the article, making it more engaging.
It’s often called a subtitle, secondary title, subheadline, subheading, deck, standfirst, or kicker in journalism—and you can add a subtitle to WordPress posts without plugin.
If you’ve been wondering how to add a subtitle to WordPress posts below the main H1 Title same as news websites on your WordPress blog, you’re in the right place. I’ve found a clean, lightweight solution that uses a small snippet of code and takes full advantage of WordPress’s built-in features.
Let’s walk through a step-by-step method to add a subtitle or secondary title right beneath your H1 heading — without bloating your site.
How to Add a Subtitle to WordPress Posts
Okay, I know what you’re thinking: “You said no plugins!”
But hear me out.
Instead of editing your functions.php file directly—which can break your site or lose changes during a theme update—we’ll use a lightweight and safe plugin called Code Snippets. It lets you safely add custom code without touching your core files.
Method 1: Use the Excerpt as a Subtitle
Step-by-Step Guide:
Step 1: Go to your WordPress Dashboard
Step 2: Navigate to Plugins > Add New
Step 3: Search for Code Snippets, then install and activate it
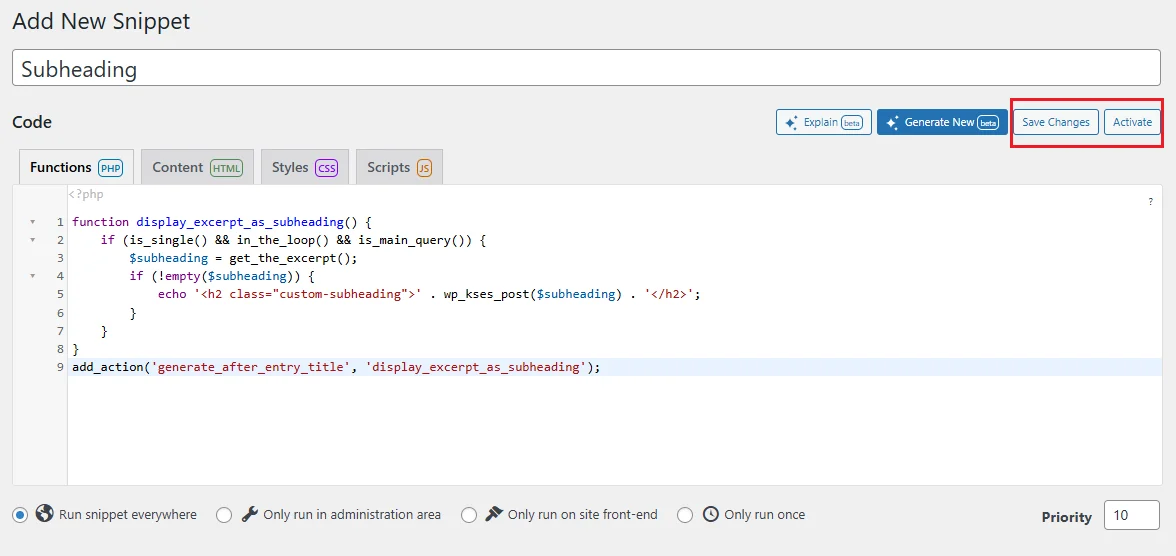
Step 4: Go to Snippets > Add New
Step 5: Give it a title “Subheading” or anything you like
Step 6: Copy and paste the code below into the code box:
function display_excerpt_as_subheading() {
    if (is_single() && in_the_loop() && is_main_query()) {
        $subheading = get_the_excerpt();
        if (!empty($subheading)) {
            echo '<h2 class="custom-subheading">' . wp_kses_post($subheading) . '</h2>';
        }
    }
}
add_action('generate_after_entry_title', 'display_excerpt_as_subheading');
Step 7: Save Changes and Activate the snippet
Step 8: Go to Posts—create a new one or edit an existing one
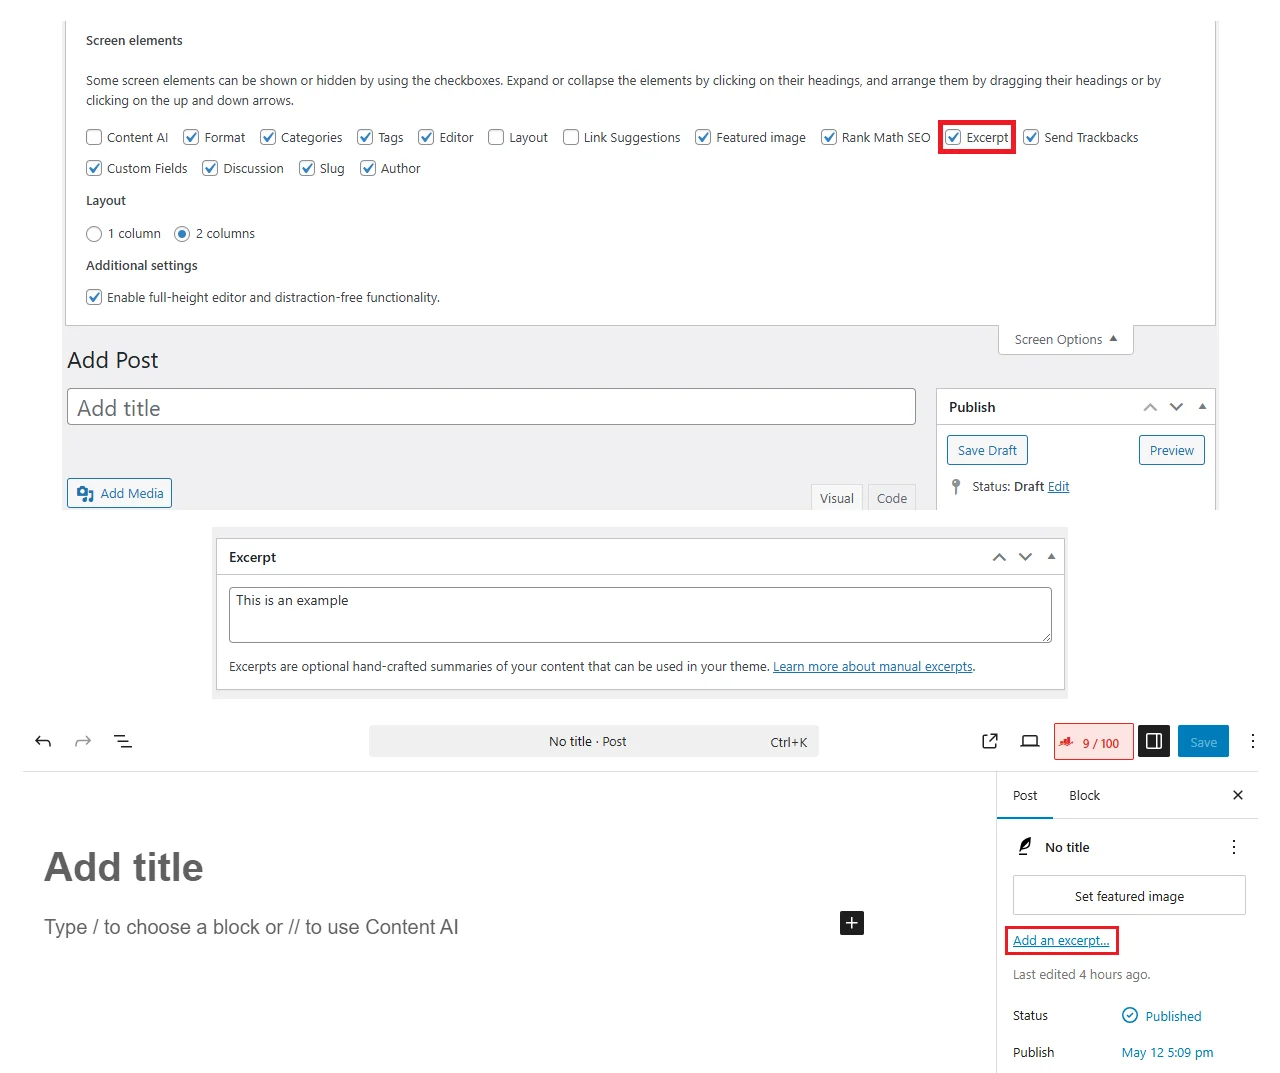
Step 9: At the top-right, click on Screen Options (if you’re using Classic Editor) and enable the Excerpt by clicking on checkbox
Step 10: Enter your subtitle in the Excerpt box and save the post
If you’re using Block Editor, toggle the settings sidebar by clicking on it or press Ctrl+Shift+, then click on Post then add an excerpt…
Done! Your excerpt will now appear as a secondary title beneath your main heading.
Styling Your Subtitle (Optional but Recommended)
To make your subtitle visually appealing, let’s add some custom CSS.
Here’s how:
Step 1: Go to Appearance > Customize
Step 2: Select Additional CSS
Step 3: Paste the following code:
/* Subheading - Default Styles */
.custom-subheading {
    font-size: 17px;
    color: #232322;
    margin-top: 8px;
    font-style: italic;
    margin-bottom: 20px;
}

/* Subheading - Tablet View */
@media (min-width: 768px) and (max-width: 1024px) {
    .custom-subheading {
        margin-top: 3px;
        margin-bottom: 16px;
    }
}

/* Subheading - Mobile View */
@media (max-width: 767px) {
    .custom-subheading {
        margin-top: 4px;
        margin-bottom: 12px;
    }
}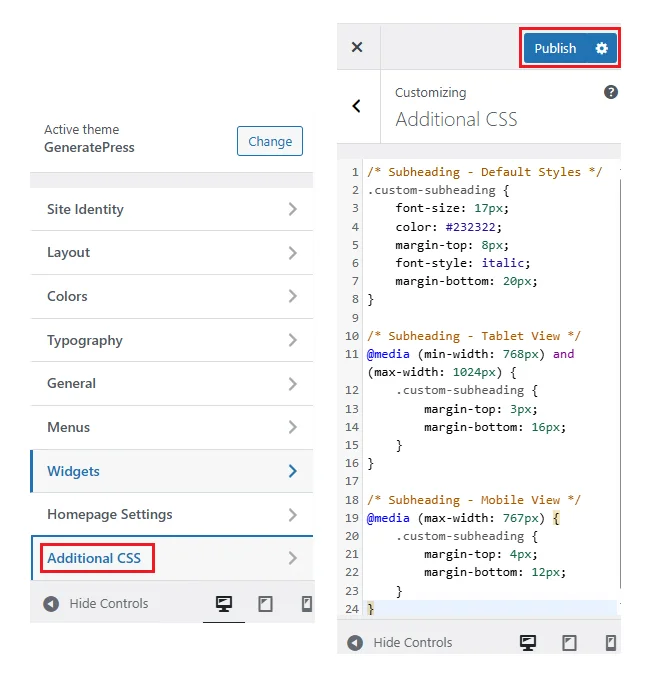
You can easily tweak the font size, color, or spacing to match your site’s branding.
Method 2: Using Hook Elements
If you’re using GeneratePress or the Kadence theme, you know they come with Hook Elements in their premium or pro versions.
If you’re a pro user of their theme then you can use this method.
Step-by-Step Guide:
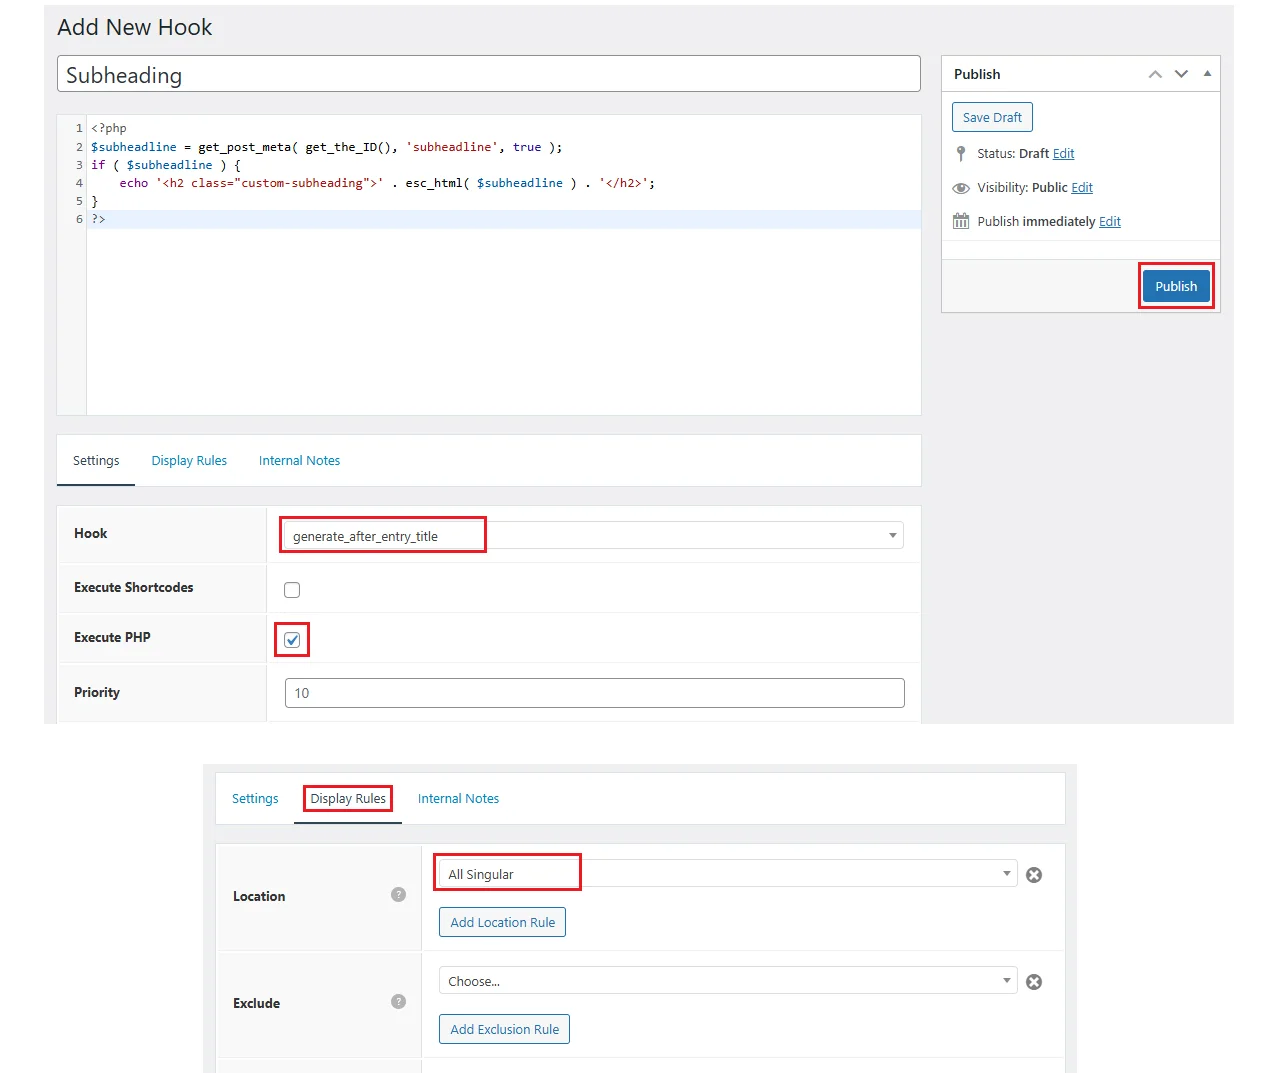
Step 1: Go to your WordPress Dashboard
Step 2: Navigate to Elements > Add New Element
Step 3: Select Hook and create
Step 4: Give it a title “Subheading” or anything you like
Step 5: Copy and paste the code below into the code box:
<?php
$subheadline = get_post_meta( get_the_ID(), 'subheadline', true );
if ( $subheadline ) {
    echo '<h2 class="custom-subheading">' . esc_html( $subheadline ) . '</h2>';
}
?>
Step 6: Inside Settings tab, select Hook: generate_after_entry_title
Step 7: Check on Execute PHP
Step 8: Inside Display Rules tab, select Location: All Singular
Step 9: Publish
Step 10: Go to Posts—create a new one or edit an existing one
Step 11: At the top-right, click on Screen Options (if you’re using Classic Editor) and enable the Custom Fields by clicking on checkbox
Step 12: Enter your subtitle in the Custom Fields by clicking on “Enter new“, in the “Name“ type subheadline and in the “Value“ write your content and click on “Add Custom Field“ button.
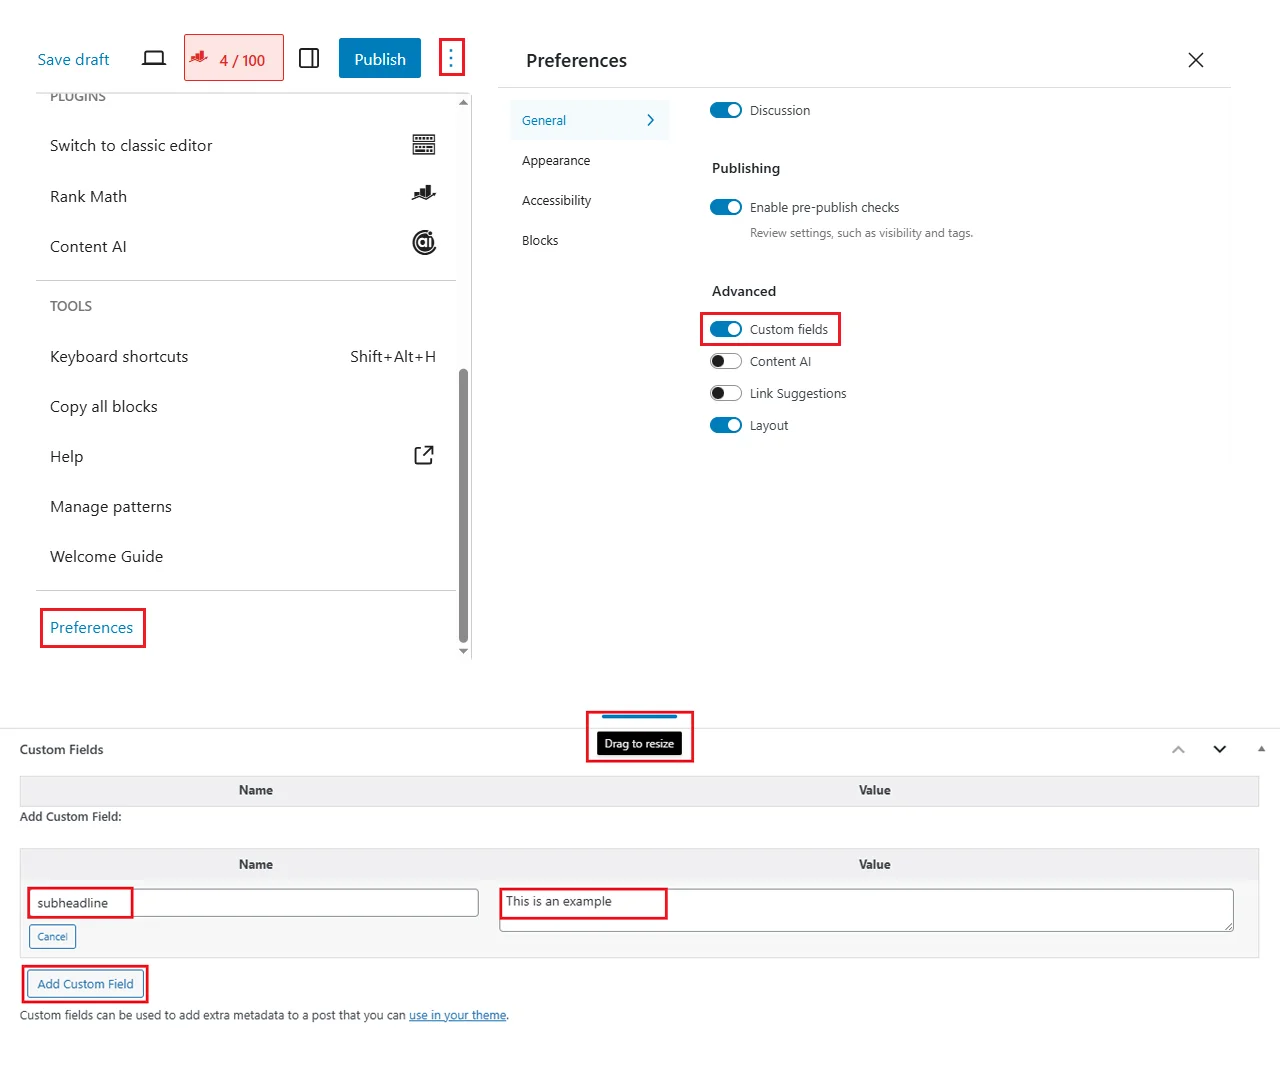
If you’re using Block Editor, navigate to the top-right corner of the editor and click the three dots to open the settings panel, then, select “Preferences” and in the General > Advanced, enable Custom fields, it will ask to “Show & Reload Page”.
In Block Editor the custom field appears at the bottom of the screen, just drag it to resize.
Done! Now you can use Custom fields for your subtitle / secondary title and it will appear beneath your main heading.
Note: You can use the same CSS from the Method 1.
Method 3: Using Code Snippet
Your theme doesn’t have Hook elements? Don’t worry — you can still add a subtitle to your post without any premium tools.
Copy and paste the code in your Code Snippet:
add_action( 'generate_after_entry_title', function() {
    $subheadline = get_post_meta( get_the_ID(), 'subheadline', true );
    if ( $subheadline ) {
        echo '<h2 class="custom-subheading">' . esc_html( $subheadline ) . '</h2>';
    }
} );
This method works even if your theme doesn’t support Hook Elements — just use Code Snippets to insert the code safely. Then, follow the same steps from Step 10 of Method 2 to enable and use Custom Fields for entering your subtitle.
Note for other Theme users:
If you’re using the Kadence theme, then replace the hook from generate_after_entry_title to kadence_entry_title_after, same goes for astra users, use hook astra_entry_content_before instead.
Why I prefer Method 1 and Method 3
Method 2 doesn’t always give you full control over display rules. In some themes, the subtitle may appear after the meta entry rather than directly below the main title.
Final Thoughts
Now you know how to add a subtitle to WordPress posts without relying on heavy plugins or making risky changes to your theme files.
This simple tweak gives your blog a more professional, editorial look, and helps draw your readers deeper into the content.
Tip: Use your subtitles to add emotional hooks, context, or SEO keywords—they’re not just for style!
I hope this guide helped you! If you found it useful, feel free to share it or leave a comment below.
FAQs about subtitle in WordPress posts
Which WordPress themes supports subtitle by default?
Some WordPress themes come with built-in support for subtitles or secondary titles without needing custom code. Popular examples include:
JNews – It offers a subtitle field in the post editor by default, so you can easily add and style a secondary headline.
Newspaper (by tagDiv) – Includes a dedicated subtitle option in the post settings, allowing you to display a subheading below your main title.
Zox News – Another theme that provides a subtitle field out-of-the-box.
Does adding a subtitle in post have any SEO benefits?
Yes, adding a subtitle in post can offer indirect SEO benefits. While search engines don’t treat subtitles as ranking factors the way they do with main headings (H1, H2), a well-written subtitle helps:
Improve click-through rate (CTR) by making your content more engaging in search results if used in meta descriptions or rich snippets.
Enhance readability which can reduce bounce rate and increase time on page — both positive user signals for SEO.
Include secondary keywords naturally, giving more context about your content to search engines.
How can I add a subtitle to my WordPress blog without a plugin?
You can add a subtitle without a plugin by using your theme’s built-in features (if supported) or by adding a small code snippet. For example, you can display the post excerpt as a subtitle below your H1 title using functions.php or a code snippet tool like Code Snippets. This method is lightweight and won’t slow down your site.